So, you’re thinking about installing solid timber flooring, huh?
Wow, talk about a game-changer for your space!
The warmth, style, and sheer elegance of timber can truly transform any room. But have you decided on the glue down method for solid timber floor installation? Ah, excellent choice!
It’s reliable, sturdy, and, with the right guidance, totally doable on your own. Whether you’re a seasoned DIY enthusiast or you’re gathering knowledge before hiring a specialist in timber floor installation Melbourne, rolling up your sleeves for this project is going to be both thrilling and rewarding.
And guess what? You’re not alone on this journey.
Let’s dive into solid timber floor installation together, shall we?
Understanding Solid Timber Flooring
Solid timber flooring brings a warm, natural beauty to any room, exuding timeless elegance. This type of flooring is made from single pieces of wood, providing a durable and long-lasting surface. Its natural variations in colour and grain mean that no two floors are exactly alike, adding unique character to your home.
Characteristics of solid timber flooring
Solid timber flooring is known for its strength and durability, making it a great investment for homeowners. You can sand and refinish solid timber flooring multiple times throughout its lifetime, allowing you to refresh its appearance or change its finish as your style evolves.
Solid timber floors can help improve indoor air quality since they don’t harbour dust mites or allergens like other flooring options.
Tools and Materials Needed
Before diving into the installation process, it’s essential to gather all the necessary tools and materials. Everything on hand will make the process smoother and help you achieve a professional-looking finish.
List of Tools
– Tape measure
– Tapping block
– Pull bar
– Rubber mallet
– Adhesive trowel
– Saw (for cutting the wood to size)
– Spacers
– Cleaning cloths
List of Materials
– Solid timber flooring planks
– Flooring adhesive
– Moisture barrier (if needed, depending on subfloor conditions)
Choosing the Right Adhesive
Picking the suitable adhesive is crucial for successfully gluing down timber flooring installation. The adhesive acts as a bond between the subfloor and the timber, ensuring durability and stability.
Look for an adhesive that is specially formulated for solid wood flooring. This will accommodate the wood’s natural expansion and contraction with changes in humidity.
Also, consider whether you need a moisture-resistant adhesive. This is recommended if installed over concrete or in areas prone to moisture.
Reading product descriptions and consulting with a specialist in timber floor installation Melbourne can help you select the best adhesive for your floor.
Preparation
Preparing your space meticulously is the first step towards a successful installation of solid timber flooring using the glue down method. This phase ensures that the area is ready and optimal conditions are met for laying down your new floors.
Measuring Your Space
Start by measuring the area where you plan to install the timber flooring. You’ll want to measure the length and width of the room to calculate the total square footage. This measurement will help you determine how much flooring you’ll need to purchase. Always add an extra 10% to your total to account for cuts and mistakes.
Acclimating Your Timber Flooring
Timber flooring needs to acclimate to the environment of the room it will be installed in. This process involves leaving the flooring in the room for a period, typically around 5-7 days. This allows the wood to adjust to the temperature and humidity levels of the room, reducing the risk of expansion and contraction post-installation.
Preparing the Base floor
The base flooring plays a crucial role in the installation process.
Preparation involves:
- Cleaning: Ensure the base floor is clean and free of dust, dirt, and debris. A clean surface is crucial for the adhesive to bond properly.
- Leveling: Check the level of the floor using a level tool. Any uneven areas should be addressed and made as flat as possible to avoid future issues.
- Moisture Testing: Conduct a moisture test on the base floor. Excessive moisture can lead to wood warping or mould growth. If moisture levels are too high, you may need to resolve this issue before proceeding.
Layout Planning
Once your space is prepared, laying out your flooring plan is the next vital step. A good layout ensures a visually appealing and structurally sound installation.
- Determining Your Starting Point
Identify the longest wall or a focal point in the room to start laying your timber boards. This will help ensure that your timber floor looks balanced upon completion. Starting at the right point can make the installation process smoother and more efficient.
- Planning Board Layout and Direction
Consider the direction in which you’ll lay the boards. Running the boards side by side along the longest wall often makes rooms appear larger. However, you could also consider laying them in a way that best complements the room’s natural light or architectural features. Planning your layout can minimise waste and ensure the pattern looks intentional and balanced.
- Account for Expansion Gaps
Wood characteristically expands and contracts in response to changes in the environment.
To accommodate this, leave expansion gaps between the flooring and the walls, usually about 1/4 to 1/2 inches wide. These gaps can be covered with baseboard or moulding, ensuring your floor has room to move without causing damage.
Glue Down Timber Flooring Installation Process
- Applying the Adhesive
Before laying your first solid timber plank, the foundation of your project lies in properly applying the adhesive. Start by ensuring your subfloor is clean, level, and dry. Apply adhesive in sections using a notched trowel, which helps to spread it evenly across the surface.
Work in small areas to prevent the adhesive from drying before the boards are placed. It’s crucial to follow the manufacturer’s instructions regarding the type of adhesive and the amount to use, as this varies depending on the timber and the subfloor material.
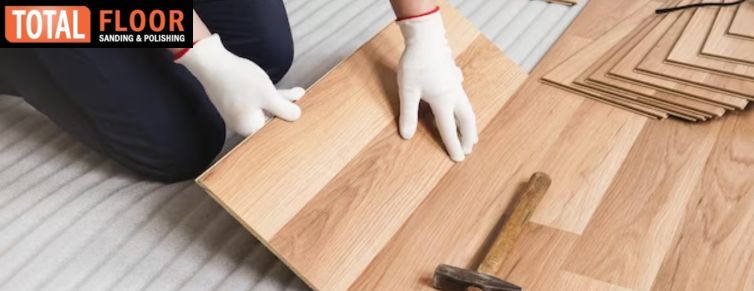
- Laying the First Row
Selecting straight boards for the first row as it influences the setup and success of the following installation stages. Begin at the longest, straightest wall, and leave a small gap between the wall and the first board to allow for expansion.
Place the tongue side of the plank facing away from the wall. Use spacers to maintain the expansion gap consistently. Carefully press each plank into the adhesive, ensuring it’s securely attached to the subfloor.
- Laying Subsequent Rows
Once the first row is perfectly aligned and secure, you can proceed with additional rows. Apply adhesive as you did for the first row, and then lock the planks together end-to-end.
Use a tapping block and mallet to gently tap the boards into place, ensuring tight seams and a uniform surface. Remember to stagger the joints for a more natural appearance and added stability.
- Fitting Boards Around Obstacles
When you encounter obstacles like pipes or door jambs, measure and mark your timber board where cuts need to be made. Use a jigsaw or coping saw for complex cuts and ensure the board fits snugly around the obstacle. Always dry-fit your cuts to ensure accuracy before applying adhesive and laying the board.
- Securing the Final Row
The last row may require trimming to fit the remaining space next to the wall. Measure the gap, considering the expansion space, and cut the boards to width. If the space is too narrow for a trowel, spread adhesive directly on the subfloor or onto the back of the plank. Gently tap the final row into place, ensuring a tight fit against the previous row.
Finishing Touches
Trimming and Fitting the Final Pieces
After all the boards are laid, it’s time to address any door frames or transitions. Measure and cut any remaining pieces for a snug fit around these areas. This step often requires precision cutting and may involve trimming the bottom of door frames to accommodate the height of the flooring.
Cleaning Excess Glue
Immediately wipe away any glue that seeps up between the boards or on the surface with a damp cloth. Be vigilant, as dried glue is much harder to remove and can mar the finish of your new floor. Follow the glue manufacturer’s recommendations for cleanup solvents if water is not advised.
Installing Baseboards and Thresholds
The final step in your installation is to attach baseboards and thresholds, which cover the expansion gaps and provide a clean, finished look. Nail the baseboards to the wall, not the floor, to allow the timber room to expand and contract. Install thresholds where your new floor meets other flooring types or exterior doors, ensuring a smooth transition between spaces.
By following these detailed steps, you will achieve a professional-looking, enduring installation of your solid timber flooring using the glue down method.
Tips and Tricks for a Professional Installation
Recommendations for a flawless result
Installing solid timber flooring using the glue down method can give your home a stunning and timeless look. To achieve a flawless result, it’s essential to follow these recommendations.
Firstly, ensure that your subfloor is perfectly clean, dry, and level. Any dust or debris can interfere with the adhesive’s bonding ability.
Secondly, consider using a high-quality adhesive specifically designed for solid timber flooring. This can significantly affect the longevity and stability of your floor.
Lastly, allow the adhesive to set slightly (according to the manufacturer’s instructions) before placing your timber boards. This can improve the bond between the floor and the adhesive.
Also, remember to leave an expansion gap around the room’s edges to accommodate any natural expansion and contraction of the wood.
Troubleshooting common installation issues
Even with careful planning, you might encounter some challenges during the glue down timber flooring installation process.
A common issue is the board not adhering properly, which can usually be remedied by ensuring the subfloor is adequately prepared, and the correct adhesive is used.
Should you notice any gaps between the boards, it often means the adhesive hasn’t been evenly spread. Removing the board and reapplying the adhesive can solve this. Lastly, buckling can occur if the expansion gap isn’t sufficient.
If this happens, it may be necessary to remove and reinstall affected sections with proper spacing to allow for wood expansion.
Maintenance and Care for Solid Timber Flooring
Cleaning tips for long-lasting beauty
To maintain the beauty and longevity of your solid timber flooring, regular cleaning is key. Use a soft-bristle broom or a microfiber mop to remove dust and debris gently. For deeper cleaning, a well-wrung mop dampened with a mild detergent specifically designed for timber floors is recommended.
Avoid using excessive water as it can seep between the boards and cause damage. Additionally, promptly clean up any spills to prevent water marks and stains.
Preventative measures to protect your investment
Protect your solid timber flooring to ensure it lasts for years. Use felt pads under furniture legs to shield your floors from scratches and dents. Use doormats at entrances to reduce the amount of dirt and grit that can be tracked onto the floor.
If possible, avoid wearing heavy boots or high heels on the flooring. Additionally, maintaining a stable indoor environment in terms of temperature and humidity can help prevent the wood from expanding or contracting excessively.
Finally, consider using area rugs in high-traffic areas to minimise wear and tear.
The Installation Journey Comes to an End
In wrapping up, installing solid timber flooring using the glue down method is a rewarding DIY project that adds warmth and value to your home. It’s a process that requires patience, precision, and a bit of elbow grease, but the results are worth it.
You get the satisfaction of having laid down each plank yourself, creating a space that’s beautiful and brimming with personal achievement.
And if you’re ever in doubt or decide you’d rather leave it to the pros, Total Floor Sanding and Polishing is here to help.
As specialist in timber floor installation Melbourne, we’re just a call away from bringing your flooring dreams to life. So why wait? Contact our timber floor installer team to make your flooring dreams a reality!

