Polishing floorboards can transform a dull, worn-out floor into a stunning, gleaming masterpiece. The task might seem daunting for beginners, but with the proper guidance, anyone can achieve professional-looking results.
This comprehensive guide will take you through each step of the floorboard polishing Melbourne process, ensuring your floors look as good as new.
Understanding the Basics: Why Polish Floorboards?
Before diving into the actual process, it’s crucial to understand why polishing floorboards is essential. Over time, floorboards can become scratched, stained, and lose their lustre due to foot traffic, spills, and general wear and tear.
Polishing restores the wood’s shine and protects it from future damage. A well-polished floor can enhance the aesthetic appeal of any room, adding value to your home and providing a sense of accomplishment.
Gathering the Necessary Tools and Materials
Having everything on hand before starting will make the process smoother and more efficient. Ensuring you have the right equipment can prevent unnecessary delays and frustrations.
Preparing the Floorboards: Cleaning and Repairs
Preparation is critical to a successful floorboard polishing Melbourne project. Start by removing all furniture and rugs from the room. Use a vacuum cleaner to thoroughly clean the floor to remove dirt, dust, and debris.
Inspect the floor for any nails or staples that may be protruding, and remove them to avoid damaging your sandpaper or sander.
Next, address any imperfections in the wood. Use wood filler to repair cracks, holes, and gaps. Apply the filler with a putty knife, smooth it out, and let it dry completely.
Once dry, sand the filled areas to ensure they are level with the rest of the floor. Proper preparation will create a smooth and even surface, which is essential for achieving a professional finish.
Sanding: The Key to a Smooth Finish
Sanding is the most critical step in the floorboard polishing process. It removes the old finish and smooths out imperfections, creating a fresh surface for the polish to adhere to.
Begin with a coarse-grit sandpaper to remove the old finish, and work your way to finer grits for a smoother finish.
Use a floor sander for the main area and an edge sander for corners and edges. Move the sander in a straight line along the wood grain, applying even pressure.
To prevent uneven areas, avoid lingering in one spot. Repeat the process with medium and fine grits once the entire floor is sanded with coarse grit.
After sanding, vacuum the floor thoroughly to remove all dust and debris. A clean, dust-free surface is crucial for the next steps.
Staining: Adding Colour and Depth (Optional)
Staining is optional but can add depth and richness to your floorboards. If you stain your floors, choose a colour that complements your décor. Test the stain on a small, inconspicuous area first to ensure you’re happy with the colour.
Apply the stain with a brush or applicator pad, working along the wood grain. Allow the stain to penetrate the wood for the recommended time, then wipe off any excess with a clean cloth. Let the paint dry completely before moving on to the polishing step.
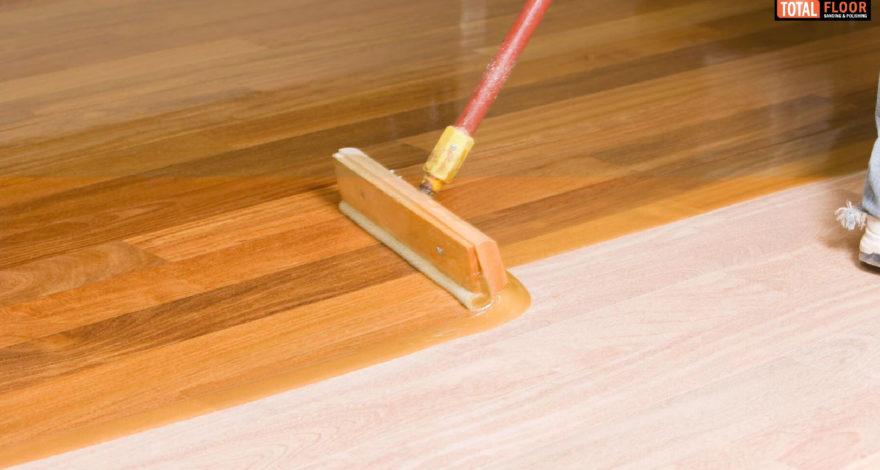
Polishing: Bringing the Shine to Life
Now that your floorboards are prepped and stained, it’s time to polish them. Polishing enhances the wood’s natural beauty and protects against wear and tear. There are various types of floor polish, including oil-based, water-based, and wax finishes. Choose one that suits your needs and preferences.
Apply the polish with a clean applicator pad or brush in small sections. Follow the manufacturer’s instructions regarding drying times and the coats needed. Two to three coats are typically recommended for a durable, high-gloss finish. Allow each coat to dry completely before applying the next one.
Buffing: Achieving a Professional Finish
Buffing is the final step in the floorboard polishing process and is essential for achieving a smooth, professional finish. Use a buffing machine or a soft cloth to buff the floor, working gently in circular motions. Buffing helps to even out the polish, remove any streaks or bubbles, and bring out the floor’s natural shine.
Take your time during this step to ensure every part of the floor is evenly buffed. The result will be a beautifully polished floor with a rich, glossy finish.
Maintenance: Keeping Your Floors Looking Beautiful
Once your floorboards are polished and gleaming, proper maintenance is crucial to keep them looking beautiful. Here are some tips to help you maintain your floors:
- Regular Cleaning: Sweep or vacuum regularly to remove dirt and debris that can scratch the surface.
- Avoid Water Damage: Wipe up spills immediately and use a damp mop for cleaning, avoiding excessive water.
- Protective Measures: Use rugs and mats in high-traffic areas and felt pads under furniture legs to prevent scratches.
- Re-polishing: Depending on the wear and tear, you may need to re-polish your floors every few years to maintain their shine and protection.
Conclusion
Floorboard polishing Melbourne can be rewarding for beginners and seasoned DIY enthusiasts. With patience, attention to detail, and the right tools, you can achieve stunning results that enhance the beauty of your home. Each step, from preparation to maintenance, is vital in ensuring your floors remain beautiful for years.
So ready to transform your floors? At Total Floor Sanding and Polishing, we provide high-quality floor polishing products and expert advice to help you achieve professional results. Visit us and start your journey to beautiful floors today.

