Ever look at your hardwood floors and wish they looked as good as the day they were installed? Years of wear and tear can dull the finish and leave your floors looking tired. But don’t despair – with some elbow grease and the proper techniques, you can return your hardwood floors to their former glory.
This article will walk you through the steps to revitalise your floors through sanding and polishing.
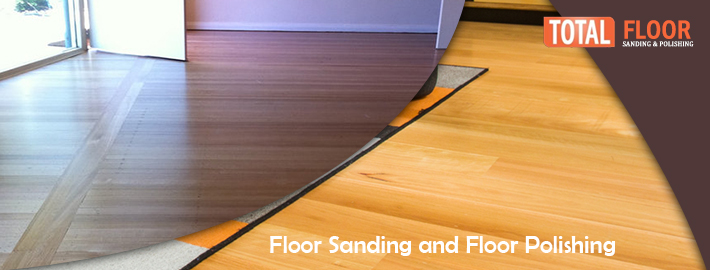
Your hardwood floors are an investment, so taking the time to refinish and protect them with floor sanding and polishing Melbourne is well worth the effort. Follow these steps, and your floors will look brand new again.
Why Floor Sanding and Polishing Is Important for Hardwood Floors?
Your hardwood floors add warmth and beauty to your home, but over time they can start to show their age. Dull, scratched surfaces and fading can make even the highest quality wood look worn down. The solution? Floor sanding and polishing.
Floor sanding removes the top layer of wood, smoothing the surface and evening out imperfections. Start with a coarse sandpaper grit to sand down damaged areas aggressively, then move to progressively finer grits until the wood is smooth. Sanding down to bare wood every few years is enough for most residential floors. In between, lighter sanding with fine-grit paper helps revive the wood and provides a “tooth” for the new finish to adhere to.
Once sanded, it’s time for the polish. Choosing a finish comes down to your needs and style. Polyurethane creates a durable, protective coat but can turn yellow over time. Water-based poly is a more natural-looking option. Oil finishes penetrate the wood, enhancing the grain. Wax and oil polishes require more frequent application but provide a soft, matte sheen.
Proper floor sanding and polishing Melbourne are crucial to maintaining your investment. Done right, you’ll enjoy beautiful wood floors for generations. An experienced flooring contractor can sand, stain, and refinish your floors.

DIY Floor Sanding and Polishing vs. Professional Refinishing
Sanding and refinishing hardwood floors can save you money but requires time, effort, and patience. On the other hand, professional refinishing will have your floors looking like new again without the hassle.
DIY Floor Sanding and Polishing
If you’re up for a DIY challenge, rent heavy floor sanding equipment like an orbital sander, edger, and buffer to sand down and re-stain or re-seal your floors. Be prepared for the mess – you’ll create sawdust galore. You’ll also need multiple passes with progressively finer sandpaper, vacuum thoroughly, and apply 2-3 coats of finish, waiting for each coat to dry in between.
While DIY refinishing can be rewarding, it may cost nearly as much as professional refinishing once you factor in rental fees and supplies. And if you’re not experienced, you risk damaging your floors or ending up with a subpar result.
Professional Refinishing
Professional floor refinishing services will handle the heavy-duty work for you. They have the proper equipment, training, and experience to sand your floors efficiently and apply an even, durable finish. Professionals can repair or replace damaged boards and patches and handle tricky areas like stairs.
In the end, professional refinishing may save you time, frustration, and the risk of mistakes. While pricier upfront, professionally refinished hardwood floors will look polished and last for years. For many homeowners, the investment in expert floor refinishing is well worth it.
Techniques to Revive Your Hardwood Floors
Floor sanding and polishing are techniques used to revive hardwood floors and return them to like-new condition. If your floors look dull, scratched or worn, sanding and polishing can make them beautiful again.
Sanding
Floor sanding removes a thin layer from the surface of the wood to smooth out imperfections and prepare the floor for a new finish. You’ll use an electric floor sander, starting with rough grit sandpaper to quickly level the floor, then progressing to finer grits. Work slowly and systematically across the floor using even, overlapping passes. Vacuum away dust with a shop vac as you go.
Once sanded, you’ll have a fresh, raw wood surface ready for polishing and sealing. For most floors, a natural wood look is achieved using 2-3 rounds of sanding with progressively finer sandpaper. For damaged floors, additional rounds of sanding may be needed. Be careful not to sand too deeply, damaging the floor.
Polishing and sealing
Polishing the floor brings back the shine and protects the wood. You’ll use floor polish or polyurethane, applying 2-3 coats. For a satin sheen, use a mid-level sheen polish. For high-gloss, use a high-gloss polyurethane. Apply polish with a brush or roller, waiting for it to dry as directed between coats.
Sealing the floor protects the polished surface from water damage, stains and scratches. Apply 2-3 coats of floor sealant, waiting for it to dry in between. Sealants can alter the floor’s sheen, so do a test in an inconspicuous area first.
With some patience and elbow grease, you can revive your hardwood floors and make them look new again using floor sanding and polishing techniques. Your freshly sanded, polished and sealed floors will be ready to stand up to heavy foot traffic for years!
Let’s Get Started!
So, there you have it, the basics for reviving and restoring the natural beauty of your hardwood floors. At Total Floor Sanding and Polishing, we specialise in reviving and restoring the natural beauty of your floors. Our expert team will leave your home looking fresh and timeless. Rest assured, your investment in our floor sanding and polishing Melbourne services will be worth every penny. After all, there’s nothing quite like the cosy charm of hardwood floors to turn a house into a home.

