Squeaky steps, a dull gleam, and enough dust bunnies to rival a wool factory: those are the hallmarks of timber floors past their prime.
But before you resign yourself to a lifetime of beige carpets, listen up!
Timber floors hold a world of hidden beauty, just waiting to be unleashed. Professional timber floor sanding in Melbourne can revive your tired planks and transform them into the gleaming centrepiece of your home.
But if you are a DIY enthusiast….
With a little elbow grease and the right know-how to sand and polish timber floors, you can transform those tired planks into a showstopping centrepiece that adds warmth, character, and (let’s be honest) serious bragging rights to your home.
In this guide, we’ll break down the process of timber floor sanding and polishing into 6 simple steps, making it even easier to experience the magic for yourself.
Buckle up, floor fans, because it’s about to get exciting!
Before we continue, let’s specify what sanding and polishing mean exactly
The sanding and polishing timber floors phase holds significant importance in determining the overall performance and aesthetics of a timber floor.
However, this stage presents a plethora of methodologies and coating systems, creating a potential maze for homeowners to navigate alone.
It’s not uncommon to witness some signs of ‘wear and tear’ over the years, such as scratches and dents.
Sanding plays a pivotal role in ensuring the boards are level, eliminating any ridges or high points. Notably, this process is often executed in multiple stages, employing various grades of sandpaper with specialised equipment.
How To Sand and Polish Timber Floors
Step 1. Assessing the Floor Before Sanding
Before engaging in the timber floor sanding and polishing in Melbourne, assess the condition of the floor to ensure its suitability for sanding.
- Inspect for Protruding Nails or Staples
Carefully examine the floor surface for any nails or staples sticking out. These can damage the sandpaper and hinder the sanding process. Remove or hammer them down to ensure a smooth sanding experience.
- Identify Areas with Wear or Damage:
Scan the floor for areas that exhibit noticeable wear and tear or damage, such as deep scratches, gouges, or stains. Mark these spots as they might require special attention or targeted sanding techniques to restore the floor’s integrity properly.
- Check for Uneven Patches or Imperfections
Look out for uneven patches or imperfections on the floor surface. These can include raised areas, low spots, or inconsistencies in the wood. Addressing these before sanding ensures a more uniform and refined final result. Fill in gaps or level uneven patches to ensure a consistent sanding process across the entire floor.
Step 2. Getting Ready to Sand
- Clear the area of all furniture and objects
Before starting the sanding process, it’s essential to create a clear and spacious work environment. Remove all furniture and objects from the area to prevent any hindrance or damage during the sanding process. This step ensures a smooth and efficient sanding experience.
- Tape off vents and openings to prevent dust from spreading
To contain the dust generated during sanding, take the time to tape off vents and any openings in the room. This precautionary measure helps in minimising the spread of dust particles to other areas of the house. Properly sealed vents and openings contribute to a cleaner and healthier working space.
- Ensure the floor is thoroughly cleaned
A clean floor is crucial to the success of the sanding process. Sweep and mop the floor thoroughly to remove any debris or dirt that might interfere with the sanding. A clean surface ensures the sanding equipment can operate effectively and produces a polished result.
Take the time to inspect and clean corners and edges for a comprehensive cleaning process.
Step 3. Sanding the Surface
Sanding timber floors is like crafting a masterpiece!
To achieve a smooth and polished floor, the initial step involves sanding the surface. Follow these steps for an effective sanding process:
- Choose the Right Grit
Begin by selecting a coarse-grit sandpaper suitable for the initial sanding. This will help in removing any existing finish or imperfections on the floor
- Work systematically across the floor, ensuring even coverage
Avoid random patterns, and maintain a consistent pace to achieve uniform results. This approach prevents uneven spots and ensures a professional finish.
- Pay special attention to edges and corners
These areas often require more detailed sanding to eliminate any remaining finish or rough spots. Use smaller tools or handheld sanders for precision in these hard-to-reach areas.
Step 4. Clearing Away Dust and Debris
To prepare your surface for the next phase, follow these meticulous steps:
- Utilize a vacuum and tack cloth to remove all sanding dust
Begin by thoroughly vacuuming the area where you’ve sanded. A vacuum with a brush attachment can effectively capture fine dust particles. Once vacuumed, use a tack cloth to pick up any remaining dust. Tack cloths are sticky and designed to trap even the smallest particles, ensuring a clean surface.
- Inspect the floor carefully for any remaining residue
Take a close look at the entire floor surface. Check for any lingering residue or dust that might have escaped the initial cleaning. A keen eye during this inspection will help identify areas that may need extra attention.
- Ensure the surface is completely clean and smooth before proceeding
Before moving on to the next stage of your project, confirm that the surface is not only dust-free but also smooth to the touch. Run your hand over the floor to detect any imperfections or rough patches. If you encounter any, address them promptly to achieve a flawless finish.
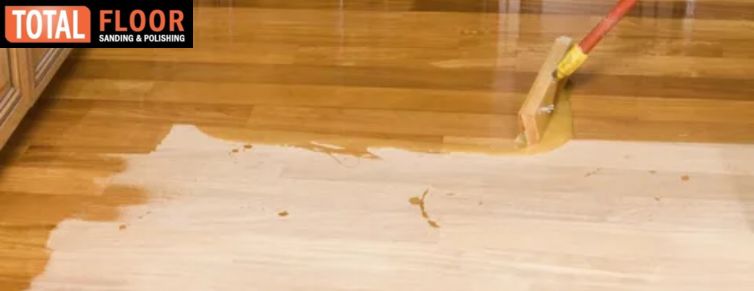
Step 5. Polishing the Surface
- Apply the first coat of finish in the direction of the grain
Begin by applying the first coat of finish, making sure to follow the direction of the wood grain. This helps enhance the natural beauty of the wood and ensures an even application. Use a high-quality brush or applicator for the best results.
- Allow ample drying time before applying additional coats
Patience is key when it comes to achieving a flawless finish.
Allow the first coat to dry thoroughly before applying any additional coats. The drying time may vary depending on the type of finish you’re using, so refer to the product instructions for guidance. Rushing this step can lead to uneven results and compromise the overall quality of the finish.
- Use fine-grit sandpaper between coats for a smooth finish
Before applying subsequent coats, lightly sand the surface using fine-grit sandpaper. This helps create a smooth and even surface by removing any imperfections or raised grain from the previous coat. Ensure the surface is clean and free of dust before applying the next coat to maintain a pristine finish.
Step 6. Applying the Coat of Finish
The six and ultimate step entails applying your selected coating. This process includes:
- Precision in cutting in.
- Application of the chosen coating (water-based or solvent-based), effectively ‘sealing’ the floor.
- Sanding and cleaning between coats.
- Repeat the application of a second coat, and continue for additional coats (usually 3 total coats).
Maintenance of Your sanded and polished Floor
Make sure to give the floor a good vacuum or sweep before starting mopping.
For floors with a polyurethane finish, you have to be cautious not to use too much water during cleaning. Water and timber don’t mix well because timber is a natural material that expands, contracts, and can soak up excess water.
There are excellent timber floor solutions specifically for mopping. We highly recommend adding a cap full of methylated spirits to speed up the floor-drying process.
Now, when it comes to water-based flooring and hard wax oil finishes, you have to avoid using methylated spirits. Instead, let’s stick to specific products designed for those finishes.
This ensures effective cleaning without risking damage to the finish.
Give Your Floors a Makeover Today!
As you wrap up your DIY adventure, remember that the care you invest in today ensures lasting beauty for tomorrow.
Timber floor sanding and polishing isn’t just a process; it’s a transformative journey. Witness your worn-out floors morph into gleaming masterpieces today.
If you ever find yourself needing a helping hand, Total Floor Sanding and Polishing professionals are here for you. Don’t hesitate to reach out for the finishing touch. Your floors, our expertise – a perfect match for a home that radiates beauty and sophistication.
Elevate your space with professional timber floor sanding and polishing in Melbourne today!

